Advantages of Using Drywall for Wall Structures
Drywall is a popular material for wall structures in construction. It has several significant advantages that make it attractive for use in many projects.
1. Ease of Installation and Processing
One of the main advantages of drywall is its ease of installation and processing. It is lightweight and convenient to work with, allowing for faster assembly work. Drywall can be cut and shaped using simple tools, making it ideal for complex architectural projects.
2. High Strength and Durability
Despite its lightness, drywall is a fairly strong material that can withstand loads and impacts. It is not damaged by minor impacts and is easily repaired if necessary. Drywall walls also have high fire resistance, making them safe for use in buildings.
3. Excellent Sound Insulation
A layer of drywall, especially when used in double walls, provides good sound insulation. It helps reduce external noises, such as noise from cars or loud neighbors, and creates a comfortable environment inside the building.
4. Cost-Effectiveness
Drywall is a cost-effective material that requires less expenditure compared to other materials for wall structures. It is affordable, readily available, and has a competitive price. Its use allows for savings during the construction or renovation of buildings.
Choosing the Right Type of Drywall
Drywall is one of the most common building materials used for interior finishes. It is made of gypsum, sandwiched between cardboard on both sides, which gives it a fire-resistant structure and high strength. However, various types of drywall are available on the market, each with its own features and purposes. Therefore, before starting construction or renovation, it is important to carefully consider the options and principles for choosing the appropriate type of drywall.
There are several factors to consider when choosing drywall. First of all, it is necessary to take into account the purpose of the room where the material will be used. For example, standard sheet panels, which have medium strength, are usually used for walls and partitions. If ceilings or mounting structures are planned, it is advisable to use improved grades of drywall that allow for heavy loads.
The second important factor is the operating conditions of the room. If drywall will be used in areas with increased humidity, such as in a bathroom or kitchen, it is necessary to choose moisture-resistant drywall, which has additional protective layers.
An additional factor to consider is sound insulation. If the room requires enhanced sound insulation, it is worth choosing drywall with sound-absorbing properties.
Moreover, the cost of the material and its availability on the market should be taken into account. Depending on the chosen type of drywall, its cost may vary. It is also important to check the availability of the selected type of drywall in local stores or from suppliers to avoid delays in construction work.
Thus, the choice of the appropriate type of drywall depends on the purpose of the room, the conditions of its operation, the need for sound insulation, as well as the cost and availability on the market. Considering these factors can ensure the reliability and effectiveness of construction work using the appropriate type of drywall.
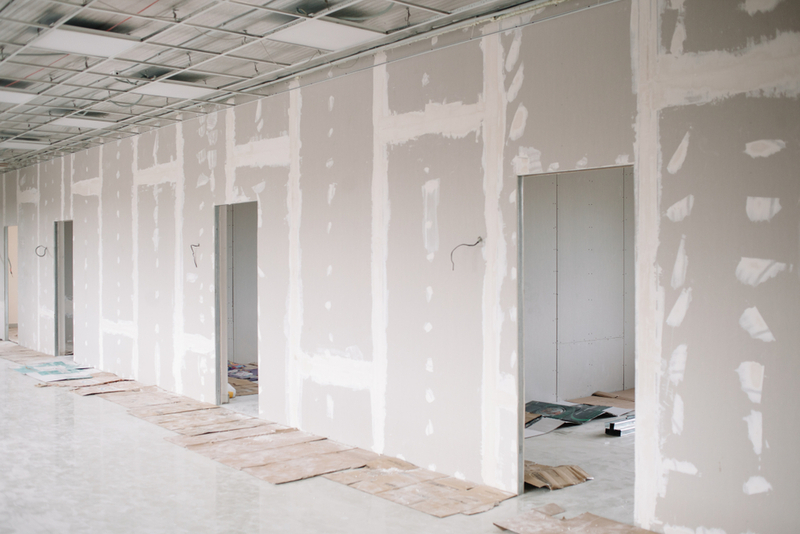
Preparing the Wall Before Attaching Drywall
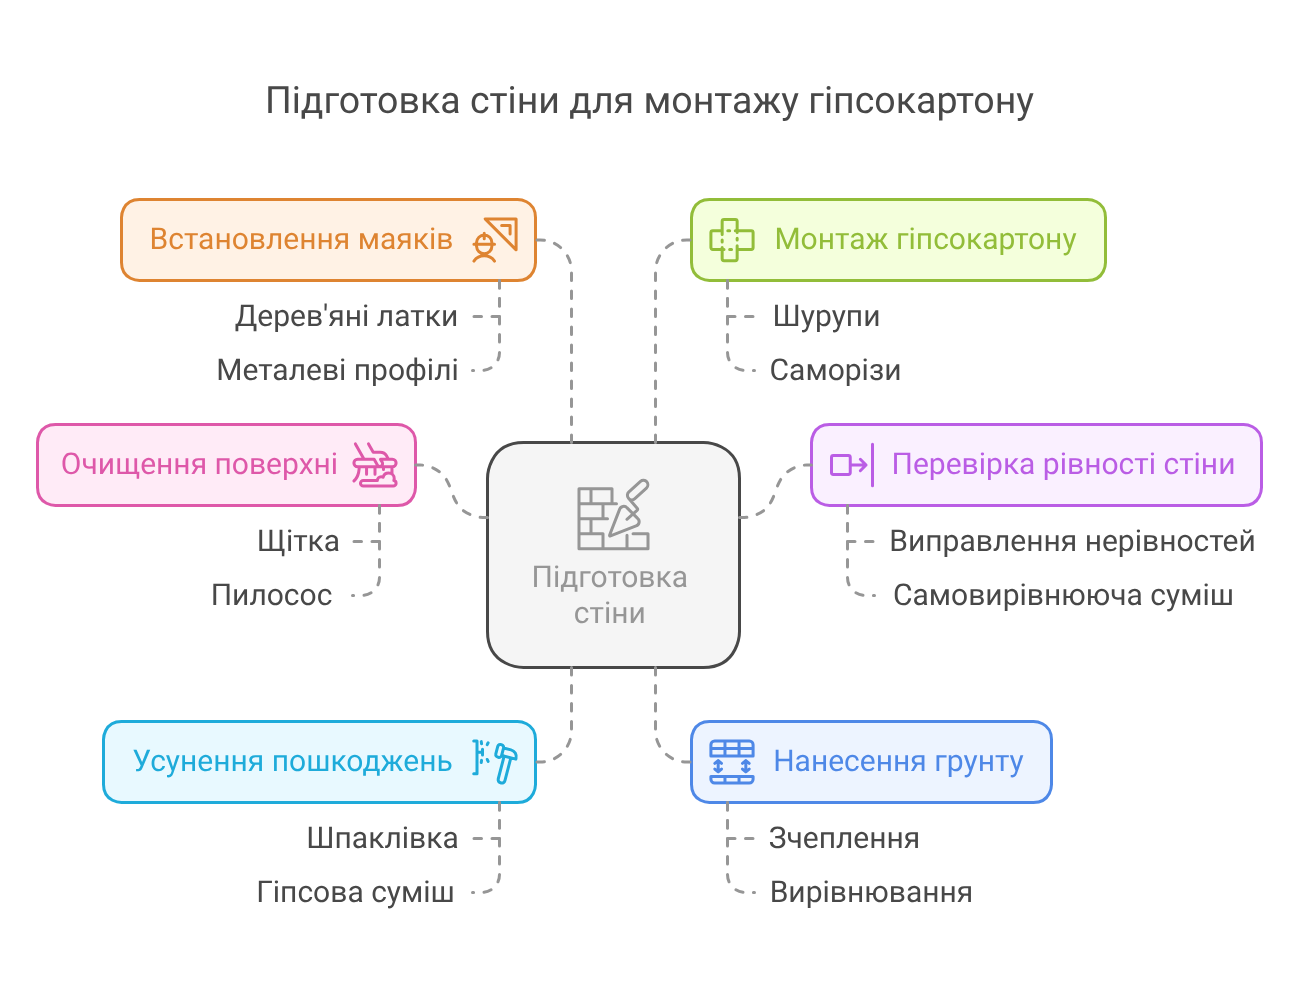
Before attaching drywall, it is necessary to prepare the wall surface to ensure maximum strength and stability of the structure. Improper preparation can lead to breaking or collapsing of the drywall after installation.
The main steps for preparing the wall before attaching drywall are:
- Cleaning the Surface – before starting work, it is necessary to clean the wall of dust, dirt, paint, or other contaminants. A brush, vacuum cleaner, or damp cloth can be used for this purpose.
- Checking the Wall’s Evenness – before attaching drywall, it is important to ensure that the wall is even and horizontal. If necessary, unevenness can be corrected using rough plaster or a self-leveling compound.
- Repairing Damages – if there are cracks, holes, or other damages on the wall surface, they need to be repaired. This can be done using putty or gypsum mix. After applying the repair mixture, it should be allowed to dry and then sanded.
- Applying Primer – before installing drywall, the wall should be prepped with primer. The primer should improve the adhesion of the drywall to the wall surface and help level out any imperfections.
- Installing Guides – guides are used to provide flatness and alignment for the drywall sheet. Guides can be made from wooden battens or metal profiles. They are mounted on the wall using a level and dowels, helping the drywall to align with the flatness of the wall.
- Installing Drywall – after preparing the wall, you can proceed to install the drywall. Using screws or self-tapping screws, the drywall sheets are attached to the guides. It is recommended to cut the drywall sheets in advance, taking into account the necessary openings for outlets, switches, plumbing pipes, or other elements.
Carrying out all these steps before attaching drywall will ensure a strong and stable structure that will be ready for further finishing. It is important to remember that proper wall preparation before drywall installation is the foundation for quality and long-lasting renovation work.
Using Metal Frames for Attaching Drywall
The importance of metal frames for attaching drywall in construction cannot be underestimated. Metal frames are an effective and reliable solution for creating partitions, walls, and ceilings in rooms. They provide stability and durability to structures, ease of installation, and the possibility of creating an aesthetic design for spaces.
Advantages of Metal Frames
One of the most important advantages of metal frames is their strength and load resistance. They are made from metal profiles, which ensure the reliability of the structure. Metal frames can withstand the weight of drywall, furniture, and other elements placed on walls or ceilings.
Another important advantage of metal frames is their lightweight and speed of installation. They consist of ready-made elements that are easy to connect, allowing for quick installation of the required structure. This saves time and effort during construction.
Using Metal Frames in Construction
Metal frames are widely used in construction to create partitions, walls, and ceilings. They allow for various architectural solutions and designs for spaces. Thanks to metal frames, panoramic windows, arches, niches, and other non-standard elements can be created in buildings.
Moreover, metal frames are an ideal solution for additional insulation and soundproofing of rooms. They allow for the implementation of additional elements, such as insulation and soundproofing materials, which improve comfort in spaces.
Options for Attaching Drywall to Wooden Walls
Attaching drywall to wooden walls is an important task during the construction or renovation of residential spaces. Proper attachment ensures the strength and reliability of the structure, as well as effectively addresses issues such as sound insulation and thermal insulation of the room. There are several options for attaching drywall to wooden walls, each with its own advantages and features of use.
1. Using Self-Tapping Screws
One of the most common options for attaching drywall to wooden walls is using self-tapping screws. It is necessary to choose screws of a special shape and length that will ensure reliable attachment of the drywall to the wall. Before screwing in the self-tapping screw, it is necessary to pre-drill a hole in the drywall and the wooden wall to avoid damaging the material.
2. Using Dowels
For a more secure attachment of drywall to wooden walls, dowels can be used. Dowels are special elements that are inserted into a hole previously drilled in the wall and secure the drywall to the wooden base. Dowels come in several types, such as anchors, screws, and wedges. The choice of dowel depends on the type of wooden wall and the required reliability of the attachment.
3. Using Adhesive
There is also the option of attaching drywall to wooden walls using special adhesive. The adhesive is applied to the back surface of the drywall and then pressed against the wooden wall. This method of attachment provides a uniform and strong bond between the drywall and the wooden wall.
4. Using Metal Profiles
Another option for attaching drywall to wooden walls is using metal profiles. Metal profiles have a special shape with protrusions that allow for secure attachment of drywall to the wooden wall. This option is especially useful in cases where a strong and reliable drywall structure on a wooden base is required.
Using Self-Tapping Screws and Screws for Attachment
The significance of self-tapping screws and screws as important elements in the current construction industry is growing every year. These fastening elements are used in many fields, including construction, renovation, and furniture manufacturing. They provide quick and reliable connections of materials without the need to drag a drill or use additional fastening elements such as nuts and bolts.
Self-tapping screws have a special design that allows them to drill a hole and screw into the material independently. This is especially useful when attaching to metal or wood, where a strong connection is required. Additionally, they can be used to connect materials of different densities, such as metal to plastic.
One of the major advantages of using self-tapping screws and screws is their simplicity and ease of use. They do not require special tools or skills for drilling holes and also save time and effort during attachment.
Another important advantage of self-tapping screws and screws is their reliability and durability. They provide a stable and strong connection that will not loosen over time and does not require constant tightening. This is especially important when working with construction structures, where safety and reliability are top priorities.
However, it is important to consider the specific characteristics of the materials to be connected, as well as the requirements for fastening. For maximum safety and efficiency, it is advisable to use self-tapping screws and screws that meet the necessary standards and are of high quality.
In conclusion, the use of self-tapping screws and screws for attachment is a significant alternative to traditional fastening methods. They provide a quick, reliable, and effective connection used in various fields. Due to their advantages, self-tapping screws and screws are becoming increasingly popular among professionals and DIY enthusiasts.
Application of Mounting Adhesives for Drywall
Mounting adhesives are an integral part of construction work and are widely used for attaching drywall. This material is popular in the construction and renovation field because it is lightweight, strong, and easy to process. One of the important aspects of proper drywall installation is the selection and proper application of mounting adhesives.
Choosing Mounting Adhesive
First of all, it is necessary to consider the properties of the mounting adhesive, such as strength, viscosity, and curing speed. The mounting adhesive should have sufficient strength to provide stability and reliability to the wall or ceiling. The viscosity of the adhesive affects the ease of application and distribution over the surface of the drywall. The curing speed of the adhesive is an important factor, as it determines the time during which the drywall must be held in place until fully bonded.
Surface Preparation
Before applying the mounting adhesive, it is necessary to properly prepare the surface to which the drywall will be attached. The surface should be clean, dry, and even. If there are any irregularities or damages, they should be corrected using putty or underlayment material. Attention should also be paid to the contact points of the drywall with the walls or ceilings, as they may require additional treatment.
Applying Mounting Adhesive
Applying mounting adhesive should be done evenly and thoroughly on one of the surfaces to which the drywall will be attached, whether it is a wall, ceiling, or other material. A spatula or a special nozzle on a caulking tube with adhesive can be used for this purpose. It is important to apply a sufficient amount of adhesive to ensure a strong bond of the drywall, but not to overdo it, as this may lead to the adhesive being pushed out from under the drywall.
Attaching Drywall
After applying the adhesive to the surface, it is necessary to immediately place the drywall in position, pressing it against the wall or ceiling. After that, additional pressure is applied to ensure maximum contact between the drywall and the surface to which it is being attached. It is also necessary to check that the drywall is in place, correctly align it, and remove any excess adhesive or squeeze-out using a sponge or damp cloth.
Methods of Attaching Drywall to Concrete and Brick Walls
Drywall is one of the popular materials for wall finishes in construction. Its lightness and versatility make it a beneficial choice for cladding both concrete and brick walls. However, the correct method of attaching drywall to these types of walls is critical to ensuring the strength and stability of the structure.
Attaching Drywall to Concrete Walls
When attaching drywall to concrete walls, several steps must be taken to achieve reliable fixation:
- Surface Preparation: Before starting to attach drywall, the concrete wall must be cleaned of any paint, putty, or other contaminants. This can be done using spatulas, scrapers, sandpaper, and other tools.
- Using Construction Dowels: One of the most common methods of attaching drywall to concrete walls is using construction dowels. For this, a hole is made in the concrete wall using a hammer drill or drill with a special concrete bit. Then, the dowel is inserted into this hole, and a self-tapping screw is screwed in to secure the drywall.
- Using Adhesive: Another method of attachment is using special adhesive for drywall. For this, a layer of adhesive is applied to the surface of the concrete wall, and the drywall is pressed against it. The structure can then be additionally secured using screws or dowels.
Attaching Drywall to Brick Walls
When considering the attachment of drywall to brick walls, the following methods should be taken into account:
- Using Self-Tapping Screws: A simple and quite reliable way to attach drywall is to use self-tapping screws. For this, a hole is made in the drywall, the brick wall is pierced through this hole, and a self-tapping screw is screwed into the brick.
- Using Metal Profiles: Another method is to use metal profiles for attaching drywall. These profiles are secured to the brick wall using dowels or self-tapping screws, and then the drywall is attached to the profiles using screws or bolts.
- Using Adhesive: It is also possible to use special adhesive for attaching drywall to brick. The adhesive is applied to the drywall or the surface of the brick, and then both surfaces are pressed together and left for a while to cure.
It is necessary to keep in mind that each specific case may require an individual approach to attaching drywall. It is recommended to consult a specialist and use high-quality materials and tools to ensure the reliability and durability of the structure.
Considering Slope and Leveling the Wall Before Attachment
When attaching any objects to a wall, it is important to consider the slope and leveling of the wall. This is crucial for ensuring the safety, stability, and aesthetic appearance of the object on the wall.
The Importance of Considering Slope and Leveling the Wall
Whether we are dealing with attaching shelves, pictures, televisions, or any other items, even weight distribution and proper maintenance of a horizontal position are key elements of safety and durability of the attachment.
The presence of slope or unevenness on the wall can lead to uncontrolled shifting of the object, which can pose a danger not only to the object itself but also to surrounding items and people. Additionally, excessive slope can cause deformation of the attachment or damage to the wall.
Execution Algorithm
- Start by inspecting the walls where you plan to place the object. Look for potential slopes and unevenness.
- Use a level to check the horizontal position of the wall. Note any identified irregularities.
- If the wall is covered with putty or paint, carefully clean these areas to accurately reflect the slope/irregularities.
- If necessary, level the wall using appropriate building materials, such as putty or drywall, tools, and techniques.
- Check the horizontal position of the wall after leveling.
- Select the appropriate type and size of fastener for the object based on its weight and size.
- Use the appropriate tool for fastening, doing so precisely in locations that correspond to the size and placement of the object.
- After securing the object, check its horizontal position and stability again.
Creating a Strong Structure with Additional Profiles
Creating a strong structure plays an important role in building an information system. To ensure optimal performance and stability of the system, it is important to properly organize its components. Additional profiles can be used to create a convenient and reliable architecture.
The Importance of Creating a Strong Structure
Creating a strong structure is a key factor for the successful implementation of a project. It ensures the effective operation of all components of the system and facilitates future expansion and modification. Additionally, a strong structure provides high reliability and safety for the information system.
Using Additional Profiles to Create a Strong Structure
Additional profiles are a powerful tool for creating a strong structure. They allow for the expansion of the functionality of the information system and provide flexibility and ease of management. Additional profiles can be used to divide the system into separate components, allowing for better resource management and ensuring high scalability.
Advantages of Using Additional Profiles
The use of additional profiles has many advantages, including:
- Modularity: additional profiles allow for the division of the system into independent components, simplifying the development and maintenance of the system.
- Expandability: additional profiles make it easy to add new functionalities to the information system without the need to modify existing components.
- Flexibility: additional profiles allow for customization of the system to meet specific user requirements and needs.
- Efficiency: the use of additional profiles helps optimize the operation of the system and effectively utilize available resources.
Calculating the Fastening Step for Drywall
One of the important stages in performing wall and ceiling finishing work in a room is the attachment of drywall. The correctly selected fastening step for drywall sheets determines the strength and reliability of the structure and affects the quality and durability of its operation.
The Technology of Attaching Drywall
Before starting work, it is necessary to determine the optimal fastening step for drywall, which depends on several factors, including:
- The thickness of the drywall sheet;
- The technical characteristics of the hardware (screws, dowels, etc.);
- The requirements for the strength and stability of the structure.
Calculating the Fastening Step
First of all, it is necessary to determine the distance between the fastening points of the drywall sheet. This is usually determined by the distance between the centers of the holes that need to be made for the fastening elements at the edges of the drywall sheet, for example, for screws.
To calculate the fastening step, the following formula can be used:
Step = Location of Fastening Points / (Number of Fastening Points – 1)
Where:
- Step – the distance between the fastening points of the drywall sheet;
- Location of Fastening Points – the distance between the start and end of the drywall sheet, where the fastening points are located;
- Number of Fastening Points – the total number of fastening points on the drywall sheet.
Application of the Obtained Value
The obtained value of the fastening step can be used when marking the surface of the wall or ceiling for further attachment of drywall sheets. It is important to adhere to the calculation and evenly distribute the fastening points across the entire surface of the sheet.
Securing Edges and Joining Drywall Sheets
One of the important stages in installing drywall structures is securing the edges and joining the drywall sheets. This process is significant for the stability and strength of the finished structure.
One of the main methods for securing the edges of drywall sheets is using a special metal profile called an edge. The edge is mounted on the edge of the drywall sheet using screws or self-tapping screws. It is important to ensure even and precise installation of the edge to avoid scratches or misalignments on the surface of the sheet. It is recommended to use special self-countersinking screws or self-tapping screws with a diameter of at least **3.5 mm** to ensure reliable edge securing.
In addition to securing the edges, it is also necessary to join the drywall sheets together. One way is to use a single-row joint. This method involves securing a metal profile on the foil tape along the inner edge of the edge of one drywall sheet, while the cutting part of the profile is inserted into the groove of another sheet and secured using screws or self-tapping screws. This method ensures the tightness of the joint and the strength of the structure.
Another method for joining drywall sheets is using a double-row joint. This method involves securing metal profiles on both sides of the drywall sheets. In this case, the profiles on one side are mounted with the marking “N,” and on the other side with the marking “I.” Using screws or self-tapping screws, the metal profiles are joined at both edges of the sheets. This method provides a reliable connection and additional strength to the finished structure, as well as reduces the risk of damaging the surface of the drywall during the holding of the structure.
Securing edges and joining drywall sheets is an important process that significantly impacts the quality and strength of the finished structure. The choice of securing method depends on the type of structure and the requirements for its strength. It is worth noting that the correct execution of these procedures will contribute to the long-lasting and safe use of drywall structures.
Puttying and Finishing Joints Between Drywall Sheets
Puttying and finishing joints between drywall sheets is an important stage in the process of installing drywall partitions or ceilings. This process allows for the creation of a smooth surface that will be ready for further painting or cladding.
The joints between drywall sheets require treatment because, after their installation, irregularities and cracks form that prevent achieving the desired surface quality. Puttying the joints helps level the surface, fill voids, and ensure their strength.
Before starting the puttying process, it is necessary to prepare the joints. This includes removing dust and dirt, smoothing the edges of the joints, and removing excess gypsum. Then, a layer of primer should be applied to the joints to prepare them for further treatment.
After this, you can proceed to puttying. The putty mixture is evenly applied to the joints using a spatula or putty knife. The main goal is to fill all voids and irregularities. After the first layer of putty mixture, it is necessary to wait until it completely dries, and then apply additional layers.
During the puttying process, various types of putties can be used, depending on the desired surface quality. Some putties have high viscosity and are easy to apply, allowing for quicker leveling of the surface. Other putties are designed for thin layers and detailed finishing of joints.
After applying the final layer of putty mixture, the surface should be sanded to achieve maximum smoothness. This process will help remove irregularities and scratches, as well as ensure an even covering for painting and finishing.
Puttying and finishing joints between drywall sheets is a necessary component of the drywall installation process. Proper application of puttying techniques and materials will help achieve a high-quality, smooth surface that meets construction standards and the requirements of property owners.
Using Reinforcing Tapes and Tape to Strengthen Joints
The use of reinforcing tapes and tape has become an integral part of the construction and renovation industry. These materials provide strength and durability to joints, helping to reinforce them and prevent cracking.
Reinforcing tapes are made from polymer materials that enhance their strength and resistance to stretching. These tapes can be either self-adhesive or applied using special glue or tape. They are used to increase the strength of joints, prevent surface cracking, and protect against moisture.
Tape, on the other hand, is one of the most popular materials for reinforcing joints. It is attached to surfaces near the joints to provide additional strength and prevent separation. Tape can come in various widths and thicknesses, allowing it to be used for different types of joints.
One of the main advantages of using reinforcing tapes and tape is their ease of use. They can be applied to any surfaces, including concrete, wood, metal, and plastic. Additionally, they do not require special tools for application, making them accessible to everyone.
Using reinforcing tapes and tape to strengthen joints saves time and effort while ensuring the reliability and durability of structures. The absence of cracking and the appearance of joints is a guarantee of their stability and safety.
Overall, the use of reinforcing tapes and tape has many advantages, making them indispensable materials for enhancing the strength and durability of joints. Regardless of the type of construction or renovation work, they will serve as reliable assistants in creating strong and stable structures.
Protection Against Moisture and Other Negative Factors
One of the most important aspects of preserving and protecting various objects is protection against moisture and other negative factors that can cause damage or loss of value. Whether dealing with electronics, documents, furniture, or buildings, effective protection is key to maintaining their quality and longevity.
Moisture can be a serious threat, especially to materials that easily absorb moisture. Humidity can cause decay, rot, or mold growth, negatively affecting the appearance and properties of the material. Additionally, moisture can lead to the oxidation of metal items, causing corrosion. To protect against moisture, it is necessary to use waterproof materials and sealants that prevent moisture from penetrating into rooms or materials.
Temperature Changes can also negatively affect various materials and objects. Repeated temperature changes can cause expansion or contraction of materials, which can lead to damage, cracks, or impair their functions. To protect against temperature changes, it is necessary to use materials that are thermally resistant or have the ability to expand.
Pollution, such as dust, dirt, or other contaminants, can also negatively impact various objects. Pollution can fill micro-pores or spaces, affecting the functioning of the object or reducing its quality. To protect against pollution, regular cleaning and the use of protective coverings are necessary.
Negative factors, such as fire or fire hazards, can also cause significant damage and loss. Fire can lead to the destruction of materials, burning of valuables, or damage to property. Fire protection involves installing smoke detectors, fire hydrants, and fire suppression systems, which help prevent and minimize the consequences of fire.
Considering all negative factors, it is important to have a comprehensive approach to protection against moisture and other threats. The use of appropriate materials, protective coverings, and security systems will help preserve the quality and longevity of objects.
Checking the Quality and Stability of Drywall Attachment
Drywall is a popular material for finishing walls and ceilings in homes and offices. It is used to create flat surfaces, divide rooms, and reduce sound penetration. However, to ensure quality and stable attachment of drywall, it is necessary to follow certain rules and use appropriate materials.
First, it is necessary to determine the load that is planned to be placed on the drywall structures. It is important to consider the weight of furniture, shelves, or other items that will be secured to the walls or ceilings. This will help determine the optimal structure and type of attachment.
Next, it is necessary to properly select fastening materials. Self-tapping screws or screws can be used to attach drywall sheets to metal or wooden studs. It is important to consider the length of the fastening element to ensure sufficient depth of penetration into the base material. For greater stability, dowels can be used, which provide additional support and reliability of the attachment.
Recommended distances between fastening elements are also significant for ensuring the stability of drywall structures. The optimal distance between self-tapping screws or screws depends on the thickness of the drywall and specific operating conditions. It is important to adhere to the recommended distances provided by the manufacturer to avoid damaging the material and ensure even load distribution.
However, attaching drywall is not limited to just using fastening materials. To ensure maximum stability, it is recommended to use special reinforcing tapes that add additional strength and stability to the drywall attachment. These tapes can be glued or secured with special clips.
It is also necessary to consider the properties of the base material – drywall. Before attachment, it is important to check for any damages, cracks, or other defects that may impair the quality of the attachment. Additionally, it is important to ensure proper countersinking of screws or self-tapping screws to avoid scratches and damage during installation.
Ultimately, the quality and stability of drywall attachment can be checked through load testing, which can simulate real operating conditions. Such tests can be conducted in laboratory conditions or in practice.
Considering all these aspects, it is possible to ensure quality and stable attachment of drywall. The correct choice of fastening materials, adherence to recommended distances, and the use of reinforcing tapes will help ensure the reliability and durability of drywall structures.
FAQ About Attaching Drywall to the Wall: Reliably and Stably
- What methods can be used to attach drywall to the wall? There are several methods for attaching drywall to the wall, including the use of self-tapping screws, metal nails, adhesive, or special fastening systems. Each of these methods has its advantages and disadvantages, and their choice depends on the specific situation.
- Do all attachment methods work equally effectively? No, the effectiveness of drywall attachment methods can vary depending on various factors, including the type of wall, the weight of the drywall, the quality of the fastening materials, and proper installation. It is important to choose a method that best meets the specific requirements of your project.
- What should be considered before attaching drywall to the wall? Before attaching drywall to the wall, several factors should be considered. This includes checking the stability of the wall, the evenness of the surface, the presence of other structures (electrical outlets, plumbing, etc.), the need for sound insulation and thermal insulation adjustments. It is also important to consider the weight of the drywall sheet and choose appropriate fastening materials for installation.
- How to properly install drywall on the wall? Proper installation of drywall on the wall involves several steps. First, it is necessary to measure and mark the fastening points, then establish several initial points to prevent the drywall from shifting. Then, use the chosen fastening materials to secure the drywall to the wall, sequentially screwing in each point evenly. Finish the process by taping the joints of the drywall and performing final surface finishing.
- Can I attach drywall to the wall myself? Yes, it is possible to attach drywall yourself. However, it is necessary to have the required skills and knowledge, as well as the right tools and materials. If you lack experience working with drywall, it is advisable to consult professionals to avoid mistakes and ensure a reliable and stable structure.
- What problems can arise from improper attachment of drywall to the wall? Improper attachment of drywall to the wall can lead to various problems, such as instability of the structure, damage to the surface of the drywall, rapid wear of fastening elements, and the possibility of detachment. This can significantly undermine the quality and safety of the structure.
- How to ensure the reliability and stability of the structure when attaching drywall to the wall? To ensure the reliability and stability of the structure when attaching drywall to the wall, it is recommended to follow best practices. This includes the proper selection of fastening materials, quality control of the wall surface, the use of additional supports, and taping the joints of the drywall. It is also important to adhere to all requirements and recommendations from drywall and fastening system manufacturers.
- What to do if problems arise with attaching drywall to the wall? If problems arise with attaching drywall to the wall, it is advisable to consult a qualified specialist who can identify the cause of the problem and suggest appropriate solutions. It is important not to delay and not to try to solve the problem yourself, as this may lead to further damage or unreliability of the structure.